

This is a very pretty drawn thread embroidery stitch used in Heirloom sewing – a stitch that is used to sew a pretty hem, join two fabric pieces together, to add trims to a fabric, or to insert lace between fabric pieces. It can be machine stitched or handstitched. Alternative names for this stitch are Point de paris and Parisian hem stitch.
Pin stitch is a very suitable stitch for bringing that old world charm to handkerchiefs, napkins, tableclothes, baby clothes, pillowcases and bedsheets.
The best fabric for sewing this stitch is undoubtedly a linen, then a cotton batiste (100% natural fabrics); the holes are naturally and beautifully visible in these fabrics. The fibers of natural fabrics are sturdy and not damaged when sewing these holes. You should also use a thin thread so that the hole is not filled with the thread.
You can sew the hem with pin stitching for a very attractive hem.

How to sew the Pin stitch
Catch the folded hem edge and the fabric with your wide needle or wing needle, as you would work a simple hem stitch.


You can find more details on hand sewing a hem here.
I will show you how to add a trim to the fabric edge with pin stitching
First prepare the edge of the fabric for pin stitching. You can use two methods.
Finishing the hem
Method 1 – with rolled edges
Sew the edge of your fabric with a rolled edged foot and your regular needle.

Now keep the lace and the fabric edge rightsides together, with the lace’s edge just inside the rolled fabric edge.

Sew the lace in place with a straight stitch or tight zig zag stitch. Now press open the lace.

Method 2 – with a wider hem
First and foremost decide on the hem width. Now keep the trim over this marking and then baste stitch the trim on top.

You can use a machine basting stitch or simple use running stitches with a hand sewing needle and thread. Ensure that the stitching line is very close to the edge of your trim.

Now press the hem allowance to the back and pin in place.
After the pin stitching is done the folded hem allowance is hemmed in place.
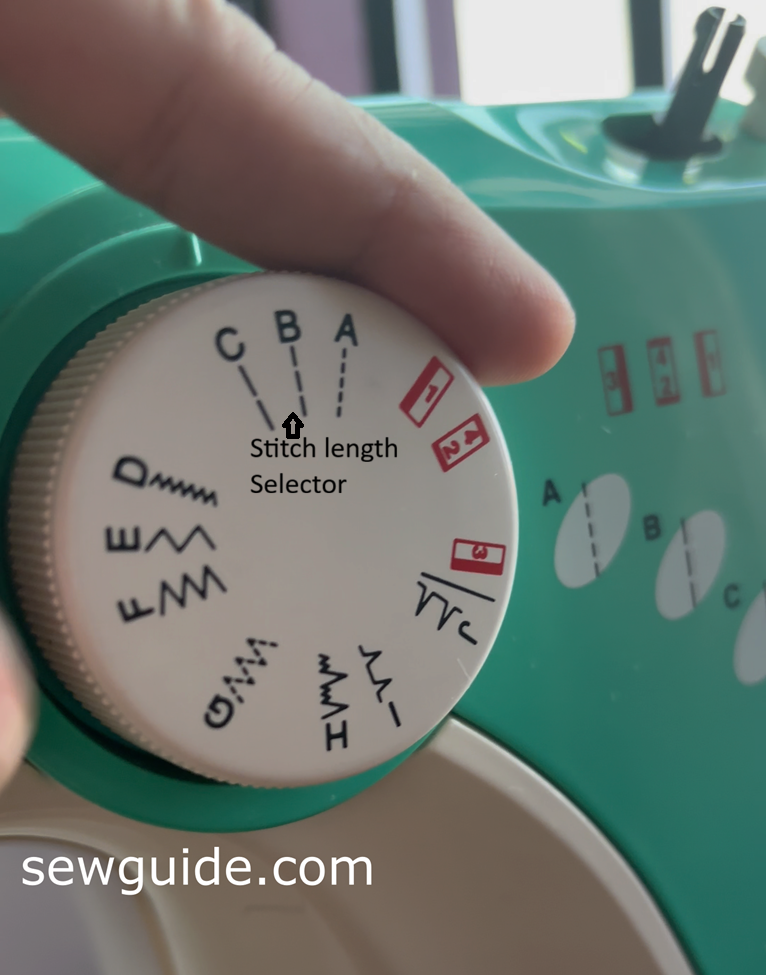
How to sew a pin stitch with a sewing machine
An easy way to make a pin stitch along an edge is to machine stitch it. If you use a wing needle on your machine you can sew the pin stitch easily enough, with the right settings. Or you can use a No.16 or higher needle used for thick fabrics.
Change the regular needle on your machine to a wing needle or a large needle. Start stitching a pin stitch setting on your machine or a stitch which looks like this. Set the machine to zig zag stitch, width to 4 and start stiching, catching the fabric as well as the trim with your zig zag stitch.

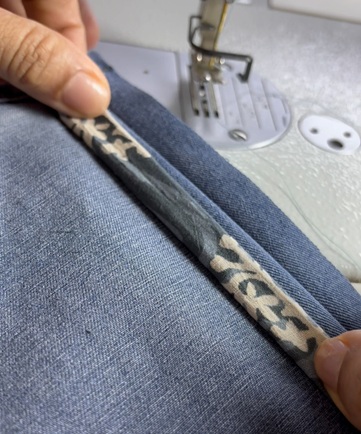
My pin stitch came out like this.

Because I am using a thicker needle and not a wing needle the holes on my fabric came out a little smaller than what I want – I had to make the holes bigger using a hand sewing wing needle.
How to hand sew a pin stitch
For hand sewing the pin stitch follow the directions given below. You can use a wing needle ( the kind with a triangle shaped tip meant for sewing leather) – this will make the necessary holes in your fabric; or a large thick needle.
Start stitching a c shaped stitch catching the fabric and the lace.


When you make this stitch (you can make this stitch any way you want) ensure that your needle will be going through each hole on the fabric twice.This is important for the hole to get bigger.

More References on pin stitching can be found at these websites : http://www.southernmatriarch.com/2011/02/applique-cord-tutorial.html; http://www.janicefergusonsews.com/blog/2012/04/21/pinstitchwhats-it-all-about/
Related posts : How to do decorative Hemstitching; Drawn thread embroidery; Pulled thread embroidery


I want baby girl frock majerment
Hi Sapna
May be this one – Sew a Simple Gathered Dress for girls : Free Sewing Pattern & Tutorial