
Looking at all those beautiful tie dye patterns in magazines and websites I used to think that tie & dye is one complicated thing that only an expert should attempt. The fact that I am writing this post is a testimony to the fact that anyone can do it.
You just need some fabric dye, suitable fabric, some tying things like strings, rubber bands and a pair of disposable gloves. Then everything is in your hands. Your creativity and endeavor make all those designs on the fabric.
If you do not know a single thing about tie and dye checkout this post first – How to do TIE DYE – 6 Basic techniques to make tie and dye patterns on fabric.
Related posts : Types of dye for fabric; How to dye fabric – an overview.
How to create Tie Dye patterns
1. Spiral pattern
This is one of the most common and popular patterns for tie dye.

Decide on where you want the spiral’s center to be on the material. Pinch that place.

Twist the fabric around that first pinch in one direction. Arrange the folds neatly around the coil as you twist.

Complete the twisting and coiling to reach the final shape of a rosette.

Tie this up with 3 cords or rubberbands, as in the picture below.

Now start dying the coiled fabric in sections. You can either just give a single color on the 2 opposing sections. This will give you the spiral pattern shown before. You can use the squeeze bottles to put the color on your chosen sections.

More areas can be filled, more colors can be used – it depends on your aesthetics.

After the dye is cured in about 5-6 hrs or more, wash the excess dye off your patterned fabric.

2. Marbled / Mottled patterns

You can simply scrunch up the fabric and then use squeeze bottled dyes on the top and bottom of the material.
For this to work, loosely tie the fabric with cotton cord.

Apply the dye on the fabric such that you are not covering the whole fabric – just on the surface.

After the dye is cured open up the fabric to find your crumple pattern.

After washing the fabric thoroughly, and drying it, press it neatly.

This marbled design is a result of scrunching the fabric and then tie and dyeing.

Twist and scrunch the fabric and then twist and tie a thread around in a random fashion over the area where you want the pattern.
You can gather the fabric up into random wrinkles by spreading your hands out and crumpling it into a tube shape.

Now start tying it up with the thick binding thread. Do not tie too closely together – you need small areas where the dye will seep through to form the marbled uneven textured pattern.

Open it up to find those beautiful marbled tie dye patterns.
3. Thick Horizontal Striped tie and dye design

To make a thick striped pattern, roll the fabric into a tube. And then just one area(where you want the base color of the fabric to show through) is tied.

Tie very tightly and very densely with thick thread across the fabric – the tying width should be equal to the width of the horizontal line you want. You can arrange the ties according to how you want the stripes to be.
Dye as usual. Open up to find striped design on your fabric/clothing.

4. Diamond shapes /Circles

These Circular shapes are made by pinching specific areas in the fabric and then knotting with thread. When you take more fabric and tie, you get a bigger circle. The smaller the fabric pinched, smaller the circle.

Here, I am inserting small beads inside these knots – this will ensure that you get consistently same sized shapes. The shape also will depend on the amount of thread you tie around the pinched fabric.
Open up your ties to find small diamond shaped or circular tie dye patterns.

The resultant tie dye patterns will look like small round shaped prints on your fabric – these designs are called buti in indian printing. When designs are formed with these small shapes the printing is called bandani.

To make this pattern you can pinch the fabric by the middle.

And then tie with thread at several intervals.

5. Diagonal lines

For this, you have to fold the fabric by the diagonal. You can also twist the fabric.

I have just scrunched the fabric by the diagonal.

Tie fabric at regular intervals starting from the middle. Now do your tie dyeing. The tied portions will appear as diagonal lines on your fabric.
This type of pattern is called Lehariya pattern in Indian tie and dye.
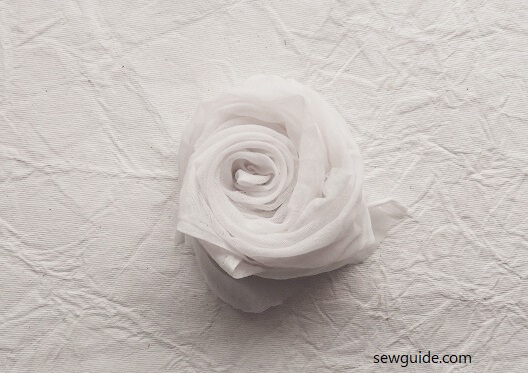
6. Swirling patterns / bulls eye patterns

To make these types of designs, you can twist the fabric by the middle. You need to swirl the fabric around a center point

Lay your fabric on the floor. Pinch the fabric by the middle (with your thumb and forefinger) and start to swirl it around.

Twist and form the fabric into a round shape. You will get a flower shape.

Tie with thread by the middle. When you tie, how much folds rise up will decide what kind of spiral you get.

Put the fabric into the dye path from the back of this tied fabric. After the dye is set (after 15 minutes or so) squirt dye to the front of the folds. Do not soak full. Just on the top.
Dry. You get a circular design.This will vary according to the way you swirl.

You can also swirl it so that the fabric is formed into a tube and then coil it. Then tie it into sections. Squirt dye on the roll you have – this method is good for making a swirl pattern with different colors
Another type of swirls can be made this way:
Pinch the fabric by the middle

Twist the fabric from the tip.

Tie with strings at intervals. Dye. Result is this.

If you make more tighter tying with the cord you get another effect.

A marbled effect in a circular design. As the fabric is not tied in the middle, the color is brighter there.

7. Outline Checks

For making a check design you need to fold the fabric into pleats.

Then fold them again.

Now you need to tie it by using the binding thread.

Tie your thread vertically and horizontally.
Tie very tightly. You can dye now.
You can also get a checked effect by folding the fabric in accordion pleats and then tying across at several intervals – this also gives an almost similar chequered look.
8. Solid checks

This check design is made by folding the fabric and dipping the fabric in dye.
Fold the fabric by the middle first. Then fold again by the middle.
Now fold the fabric as in the picture below.

Now turn the fold the fabric into triangular shapes as in the picture below.

Dip the two corners of your triangular shape.

After it is dry, open up and you get these chequered shapes.
9. Streaks

To make this beautiful streak pattern, first tie your fabric around a tubular object like a plastic pipe.

Now tie thread over this in a random fashion, overlapping, crisscrossing etc.

Dye this – if the vessel is not big enough to accommodate the pipe, you can pour the dye over the fabric with a plastic spoon(place it on a plastic surface or on newspapers to avoid the mess).
Related post: Arashi shibori dyeing tutorial.
10. Zig zag patterns in tie and dye designs

To get this pattern,fold your fabric into accordion pleats by the diagonal direction.

and then fold it into a small pack by folding horizontally as well.
Tie with string across by the middle.
Dip your fabric pack into the dye bath on one end only. Dye for the stipulated time. You will get this pattern.
Shibori is very similar to tie and dye and creates some wonderful dyed patterns. You can checkout the post on shibori dyeing here for similar folding techniques and more.
Related posts: How to dye fabric – an overview.; How to do fabric painting.; Nui shibori dyeing ; Arashi shibori


Nice presentation. Intrested people can easily get idea how to bind cloths.
Fantastic! Thanks so much for showing how to do all these lovely dye designs.