
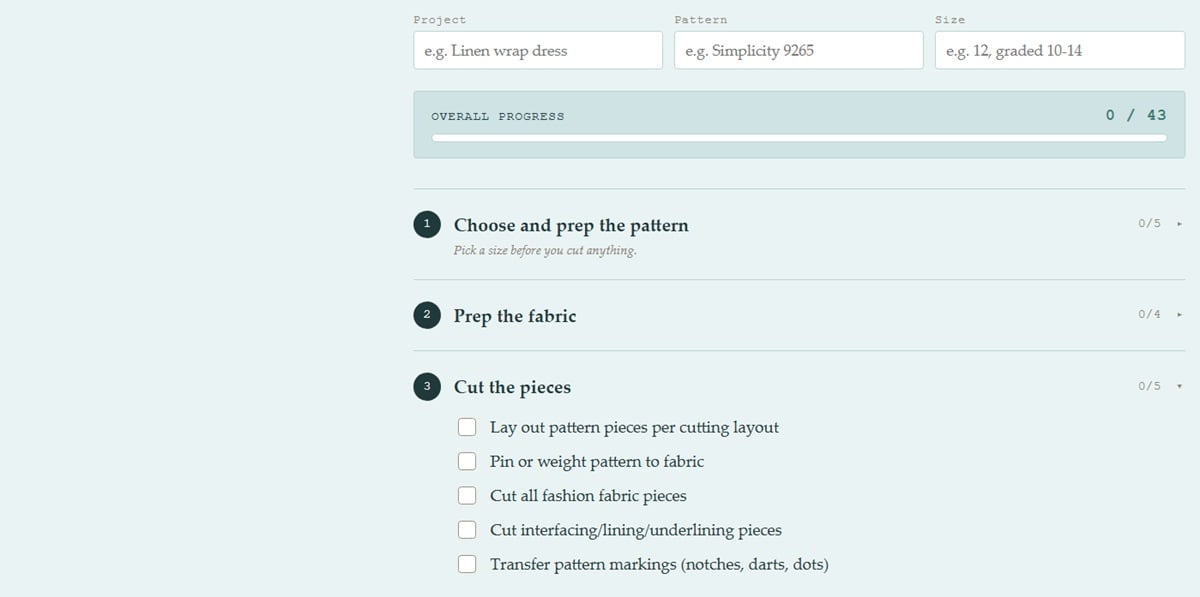
If you struggle with keeping track of every step when sewing a garment, forgetting whether you already understitched that facing or pressed that seam, this interactive checklist is for you. This checklist keeps you on track from pattern to finished garment. It has been very useful to me as a forgetful sewist. I have been known to cut one side sleeve twice and using the wrong side of the fabric as the right side and even more drastic ones I do not want to think about. Even if you are better than me, this will keep you organised in sewing.
This is a free, interactive checklist that walks you through every stage of sewing a garment – from choosing your pattern size all the way to the final press before you wear it. Instead of flipping back and forth between pattern instructions, notes, and your own memory of “wait, did I already understitch that facing?”, you can work through the whole project one stage at a time, checking off each step as you go.
It’s built as a living checklist, not just a static list: tap any stage to expand it, check items off as you complete them, and watch your progress bar fill up as the garment comes together. When you’re done for the day, come back and pick up right where you left off.
Follow the order given in this checklist – sewing stages out of sequence is the #1 cause of a garment that’s hard to finish cleanly. Plan your cutting and construction around these stages before you sit down at the machine.
Garment Sewing Checklist
From pattern to finished garment. Tap a stage to expand it.
⬇ Download this checklist as a standalone file
sewguide.com
And to the best part – you do not have to visit this website to use it if you do not want to. if you’d rather work with it on your own, you can download it ☝🏽and use it on your computer or print it and mark on it with pen and paper. Just hit print on the downloaded file and it’ll format cleanly for your sewing binder or the wall above your machine.
This checklist is for anyone sewing a garment from a pattern – whether that’s your first-ever me-made top or your fiftieth dress. If you’re newer to sewing, it doubles as a roadmap so you always know what comes next and why. If you’ve been sewing for years, it’s more of a safety net – a way to make sure nothing gets skipped when you’re moving fast or working on a project with a few more steps than usual (set-in sleeves, a lining, a tricky closure).
It’s built around a fairly standard garment construction sequence, so it works well for wovens and most garment types.
Take your sweet time sewing your dream project.
Note: If your project skips certain steps entirely (no lining, no zipper, no interfacing), just skip those sections – the checklist is meant to flex around your project, not the other way around.
How to use the garment sewing checklist
- Fill in your project details at the top — project name, pattern, and size. This is just for your own reference while you work.
- Tap a stage to expand it and see the steps inside.
- Check off each step as you finish it. The stage number turns into a checkmark once everything inside it is done.
- Watch your overall progress fill in at the top as you move through the project.
- Reset all whenever you start a new garment.
- Print if you’d rather work from paper — it’ll lay out all the stages and steps cleanly, with empty boxes to check by hand.
One thing worth knowing: this doesn’t save your progress between visits. If you close the tab, your checkmarks will reset. That’s intentional — it keeps things simple and works entirely in your browser without needing an account or storing anything. If you’re working on a project across several days, either keep the tab open, use the print version to track by hand, or download the file to your own computer so it’s easy to reopen anytime.
The Stages of the checklist, explained
1. Choose and Prep the Pattern
Take your actual body measurements (not your ready-to-wear size) and compare them honestly to the pattern’s own size chart, since sizing varies wildly between brands. If your measurements land between sizes, or differ across your bust, waist, and hip, this is the moment to grade between sizes rather than picking one and hoping for the best.
Read through the full instructions once before cutting anything – patterns often use a specific construction order for a reason, and knowing what’s coming helps you catch anything unusual (an unusual closure, a lining method, a step out of the order you’d expect) before you’re mid-project.
2. Prep the Fabric
Every sewist worth her salt knows to prepare the fabric for sewing. Fabric shrinks, shifts, and behaves as it does, not as you want. So treat it the way you’ll treat the finished garment.
Pre-wash and dry it using the same method you’ll use once it’s sewn, so any shrinkage happens now rather than after all your work is done.
Press it flat, check that the grain is straight (a lot of fabric shifts slightly in storage or shipping), and take a moment to check for any directional print or nap — velvet, corduroy, and directional prints need every pattern piece laid the same way, or you’ll end up with pieces that look subtly “off” once sewn together.
3. Cut the Pieces
Lay out your pattern pieces according to the cutting layout in your instructions. If you do not have instructions, use the grainline of the fabric as direction.
Pin or weight everything securely before cutting so nothing shifts. Cut your interfacing, lining, or underlining pieces at the same time as your fashion fabric.
Finally, transfer every marking — notches, darts, dots — before you put the pattern pieces away. Future you, mid-construction, will be grateful.
If you want a Precutting checklist for fabric, you can find one here. Read on – If you want more details on cutting fabric on the bias, cutting fabric with fabric patterns and prints
4. Interface and Stabilize
Interfacing gives structure to collars, cuffs, facings, and plackets. Stay-stitching any curved or bias edges (like necklines) now prevents them from stretching out of shape as you continue handling the fabric through construction. If your pattern calls for understitching on facings, it’s often easier to do at this stage too, before those pieces are attached to the rest of the garment.
5. Construct the main dody
Sew your darts and pleats first, since they shape the fabric before the major seams go in. Join your shoulder seams, then your side seams- and press as you go rather than waiting until the end.
Pressing each seam open or to the side as you sew (instead of all at once later) makes for a noticeably more polished, professional-looking finish, and it’s much easier to press an open seam than to fix one you’ve already sewn over.
Related posts : Sewing tools to start sewing ; Select your sewing thread ; Using your sewing machine properly – the setup; Which sewing machine to use as a beginner
6. Set in Details
Attach the collar or neckline facing, then set in sleeves – easing them smoothly into the armhole rather than forcing them can make the difference between a sleeve that hangs well and one that puckers.
Add pockets if your pattern includes them, insert your zipper or other closures, and attach a waistband or yoke if your garment has one.
7. Fit Check
Try the garment on before you commit to any hems or final finishing – this is your last easy chance to make adjustments.
Check the ease throughout (does it move the way you need it to?) and pinch out any excess fabric that doesn’t sit right. Mark anything that needs adjusting directly on the garment while you’re wearing it, since it’s much harder to spot fit issues once it’s back on a flat surface. Make any adjustments, then re-press before moving on.
8. Finish Edges and Hems
With fit confirmed, it’s time to make the inside as tidy as the outside. Finish your raw seam allowances – serging, zigzagging, or binding, depending on your fabric and preference – to keep things from fraying with wear and washing.
Hem your sleeves and the bottom edge, then give everything a final press. A crisp hem is one of the details that instantly makes a handmade garment look finished rather than homemade.
If it is a skirt, many experienced sewists recommend waiting for 24 hrs to let it hang before you hem.
9. Closures and Final Details
Sew your buttonholes and attach buttons, snaps, or hooks – testing the buttonhole on a scrap first if you’re not confident in your machine’s settings. Add any topstitching for both durability and a clean, finished look.
Trim every loose thread then give the whole piece a final steam or press.
10. Final Inspection
This is the part where you inspect your sewing for mistakes and mishaps like a pin left there, a crease in the wrong place, a seam which is not strong enough. Check your seams for strength and any skipped stitches -a quick tug test on seam allowances can catch weak spots before they become a problem later.
Make sure the garment hangs or sits correctly on your body or a hanger. Remove any visible markings left over from chalk, pins, or tailor’s tacks.
And if you’d like, this is the moment to photograph your finished piece .
Related posts : Dressmaking tips
