
Piping is a decorative sewing technique of using a cord covered with fabric strips.

In clothes it is used in a number of ways ; It is used mostly on necklines, with a contrasting coloured fabric. But self same fabric piping can also take on a beauty on necklines. Check out this post on 3 ways to sew piping on neckline.

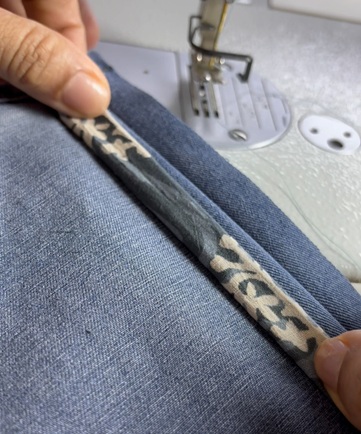
In this pant, it is used on the side seams – When done in a complementary colour it can really enhance the beauty of the garment.

Make piping cord
If you would rather watch the video on making piping, here it is
You just need a fabric strip and some cord to make this decoration. A zipper foot attachment on your sewing machine is another requirement.
If you are professional sewist, you will know the importance of pre-washing. Prewashing applies to the cord to be inserted inside your piping too.
The fabric strip for making the piping can be cut diagonally ( bias tape) or on the straight grain ( parallel to the selvedge). You can use any size cording – just make sure that the surface is somewhat smooth. Usually cotton cable cord is used. If it is very twisted the piping will not look finished.

If you cut bias tape (fabric strips cut at a diagonal angle), it will be flexible and stretchy enough for sewing around corners and adjusting to stretchy seams. Checkout the post for double and single folded bias tape for more details – there are many easy ways to cut a bias strip. If you have a big project you will need long lengths of continous bias tape and all the tips to easily cut them will be welcome.
For attaching to straight edges you can use fabric strips which are cut anyway- lengthwise, crosswise or by the bias.
Related posts : Cutting Fabric for Sewing Projects ; How to cut fabric on the bias; How to bind necklines with bias tape- 6 ways.
Piping filler cord

You can use cotton yarn cord (cotton cable cord) available in white color as the filler cord for your piping. Polyester cord is also used. For upholstery piping with thick fabrics you can use a thicker cotton cable cord. You can also use thicker paracord for a thicker filling. Many use soft and thin rayon cord. Another variety is waxed cord – this is best if you want stiff piping
Learn about the different types of cord here. If you do not have cord, you can follow the tutorial here to make cords yourself from thread yarn etc.
How to make piping cord with Single fold bias tape
You can use a single folded fabric piece or a double folded piece for the piping. For attaching on seams with a facing you can use a single fold bias tape. On edges you can use a wide double fold bias tape and it can form a facing for the edge.

For making single fold bias tape suitable for piping cut the bias tape 1.5 inch wide ( you need space to insert the piping cord and then some 1/2 inch or more seam allowance. So calculate according to the size of your cording) . After sewing along the cord as explained below sew the edges with a zig zag stitch or a serger.

How to make piping cord with Double folded bias tape
For attaching on a seam or neckline without a facing double fold bias tape works best ( here the cut edge will be folded to the inside)
- For making a double fold bias tape suitable for piping cut the bias tape 2 inches wide (or according to the width of your cord; here you need an extra 1/4 inch on either side for folding and turning inside along the edges).

- Lay the cord down the middle of the bias tape wrong side up. Fold the bias tape with the cord inside

- Now attach the zipper foot on your sewing machine
- Place the presser foot so that it is lying just outside of the enclosed cord when it is down. Ensure that when sewing your needle is not piercing the cord and that you are not sewing it too close to the cord. A snug fit is enough.

- Stitch the whole length. This is your piping cord

If you feel that the two stitching lines you make along the piping stiffen the seam, you can skip this step and hand sew the piping with basting stitches first.
How to sew piping on fabric edges
Finish the edge of the fabric with a folded edge finish or serger finish.
Keep the piping on the hemline or where you want the edge finished cut edge of the fabric along or just inside the cut edge of the piping on the RIGHT SIDE. ( ie the folded edge of the piping with cord is facing the body of the fabric) Pin in place

With the zipper foot again on the machine stitch on top of the earlier made stitching line along the cord. Ensure that the stitching is inside the earlier stitching line.

Turn the seam allowance to the back. Top stitch the piping in place.

On curves, you may have to clip the seam allowance. Clip the seam allowance on the piping cord up to the line of stitches. Do not clip further than the stitching line of the piping.
To attach piping cord to an outside curve, place it onto the right side of the main fabric matching the raw edges. Pin it in place, clipping the seam allowance to ensure that the fabric lays flat.
To attach piping cord to an inside curve, work in the same way as an outside curve allowing the seam allowance to overlap where it is clipped.
How to attach piping along curves
Checkout the post on making scalloped edges for more details on scallops
You cannot attach piping on curves the same way that you do for other edges. Cut the curves on the fabric edge with a 1/4 inch seam allowance.
Clip the seam allowance every 1/2 inch and especially along the inward corners.
Turn the edges inwards folding it to the inside. press in place.
Keep the double folded piping under the turned edge. Start pinning along the edge and as you reach the corners clip the seam allowance of the piping corp also. Then over lap the piping cord at these junctions. Pin in place.Top stitch.
How to attach piping to a slit

Cut out double folded bias tape in the length you want for the slits. If you are cutting bias strips cut it 2 inches wide.

Fold the edges 1/4 inch to the inside on both the edges and then press in place. After this fold it by the middle. Insert your piping cord inside.

Sew along the cord with a zipper foot to make your piping.

Sew the seam of your garment till the slit.

Trim the seam allowance of the slit edges to 1/2 inch if it is more. Open it up infront of you witht the seam allowance of one side opened.

Keep the piping on top of the edge, along the seam line.

Sew in place. Use the zipper foot to sew very close to the piping thread.

Turn the piping seam allowance to the back. Top stitch from the top along the piping with the zipper foot. Match thread with the main fabric.

Next stitch along the outer edge of the stitching line you just made with a 1/2 inch distance between them. This will catch the piping edge as well.
Follow the stitching lines shown in the picture below.

You can check out the tutorial for sewing other types of slits on your fabric here.


Great info, thanks!
To make the piping for a cushion, can I use stretchy denim?
What an excellent article!
Thank You Ma! by the grace of god we shall be professional tailor.
Hi. Do you have any tips for sewing 3mm satin twisted cording to a quilt top along seam lines? I’m making a crown royal bag quilt and don’t know how to add the cording from the drawstring bag… thanks
How do you cover piping cord with material and turn?it inside out ….I don’t want to attach to a garment but to use it by itself, how do you turn it right side out after it’s sewn?
Hi Pattie
You can use the method in this post on making fabric tubes for what you want
Dear sir or madam,
Please send me PDF format of this document as it is very help full to sew. Kindly also send me the paper pattern to show how we can sew as a beginner.
I really appreciate your website as it is very help full which helps me to know some of the terminology of sewing and designing.
With best regards,
Thanks. I donot have a pdf though. Hope ou will be able to draft patterns on paper yourself . You can start with small projects like https://sewguide.com/easy-jacket-pattern/ and go from there . besst wishes
I love this way of giving a distictive look to neck lines horizontal seams , actually anywhere . its a great way without any hassel to accenuate a design in a garment
Yes, piping looks great especially when it is made in a complimetary colour to the main colour of the garment 🙂