
The tissue box you buy from shops is functional alright, holding the tissues inside safely, to be placed anywhere for you to grab it whenever you want it. But can you imagine the same tissue box winning a design award. Far from it. It is plain and sometimes even ugly in not so pleasing color combinations.
How convenient that you have fabric at home and with some simple stitching you can convert the ugly branded cover into a thing of beauty. If I may say so myself. I say, you can do better than me. So here is the tutorial to make a fabric tissue cover.

This is for a 8.5″ by 4.5″ tissue box. You need some fabric, 1/4 inch elastic 14 inches and a little sewing knowledge.
Cut out the required fabric pieces : 2 pieces of fabric – 14 inches by 7 inches ; 2 pieces of fabric 10 inches by 3 inches ; 1 piece of fabric 31 inch by 6 inches.

On the face of the 7 inch by 14 inch fabric piece you can do some embroidery – this is the outer covering of your fabric tissue box cover. Draw the design some 1 inch to the inside from the 14 inch side. Draw free hand as I did or trace from a design book so that it is symmetrical unlike mine.
Checkout how to sew applique by hand – which is what I have done in here or some designs for floral embroidery you can do on the tissue box or Embroidering Text in Needlework

Related post: How to embroider a leaf
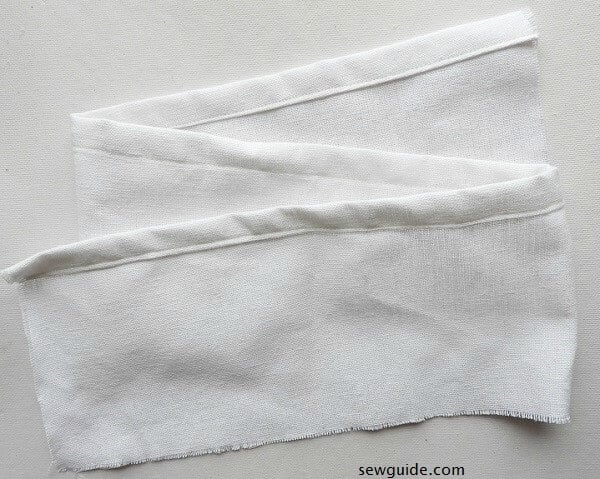
Keep the two 7 inch by 14 inch pieces together (right sides together) and stitch them together with 1/2 inch seam allowance – leave 6 inch from the middle unstitched (red lines indicate stitching lines in the picture).

Open this – and press the seam allowance open. Sew the seam allowance to the sides as shown in the picture below

This is how it will look from the front – you have a nice hole in the middle for taking out the tissue.

Do the same with the small pieces ( 10 inches by 3 inches pieces).

Finish the edges of the bigger piece. Keep aside. You can also attach lace trims or ribbon or whatever you fancy along the edges for a more decorative look.

Take the long fabric piece ( 31 inches by 6 inch) and turn under one long edge to the inside twice (1/4 inch first and then 1/2 inch) and stitch in place. This is a casing for a 14 inch long 1/4 inch wide elastic.
Insert the elastic through the casing with a pin.

Sew the short edges together to make a tube as in the picture below.

Now the small piece and the elastic tube has to be stitched together. Turn the tube wrong side out and keep the small piece right side up.

Now keep them together and join the edges together – the circular tube piece and rectangle piece has to be joined together – and they should fit perfectly together – if they do not , give small pleats

Turn it right side out – the cover is done.

Fit it over your tissue box – the elastic will ease it over the box and fit snugly.

Place your embroidered fabric piece over the cover and use simple stitches on the two sides to attach the fabric to the cover.

Next one, I will make with this fancy fabric.

Related posts : Make your own scrunchies. ; Make fabric baskets; How to sew a round floor cushion


Where do you put the stitches to attach the fancy bit to the box cover, near the opening? Is there no way of peranenty attaching the fancy bit to the box cover?
You have to make small tacking stitches by hand or machine, at the lip of the hole, attaching the top to the real cover.
Lovely, thanks
Thanks Rollybrigy