
With three long-haired heads, Scrunchies are indispensable in our house – and then they keep disappearing! I buy a pack of those boring black ones every month and by the end of the month, they are all gone.
My kids said that I am the culprit. Did they think I ate them! I suppose the floor did ‘eat’ them; and from the floor to the wastebaskets is a short trip, when my hubby notices them – he, who does not realize the importance of those small fabric bands named scrunchies. I have solved the case of the missing scrunchie. But I still need them. So it is DIY scrunchie time.
I have now decided to stop buying them. I can very well make the fabric scrunchies with all my small fabric scraps in all colours and patterns, and not mind much when I lose them. Here is an excuse to make more and more and more.
The best thing is – the smallest fabric scrap you have, would still make a scrunchie.
The scrunchies are basically fabric strips joined to form a tube and inserted with elastic. But you can change this basic scrunchie into so many styles with simple ideas, which I will outline below
In fact the scrunchie is a super easy project that you can ask your kids to do. Make it their first project for teaching the kids to sew. Easy enough to do and when they use it they are proud that they made it themselves. They will soon be making scrunchies in all colors to match their many outfits
How to make do-it-yourself fabric scrunchies
What materials do you need to make the scrunchy?

What type of elastic is used for scrunchies? You can absolutely work with any elastic you have, but Knitted elastic is considered best to make scruchies. You can also get braided elastic. A small piece of elastic 5-8 inches long (for thick hair double this or use two lengths) Note : The elastic size needs to be tested on your hair. A 7 -8 inch long elastic is alright for a medium thickness of hair but you may have thicker hair and this would not suffice. Test it on your hair.
You need a piece of fabric strip – You can use all types of fabrics for making the scrunchies – cotton, silk, satin, or velvet. You can use up your fabric scraps and make them in different colored fabrics so that they complement various outfits. It is better to use sturdy tight woven fabrics.
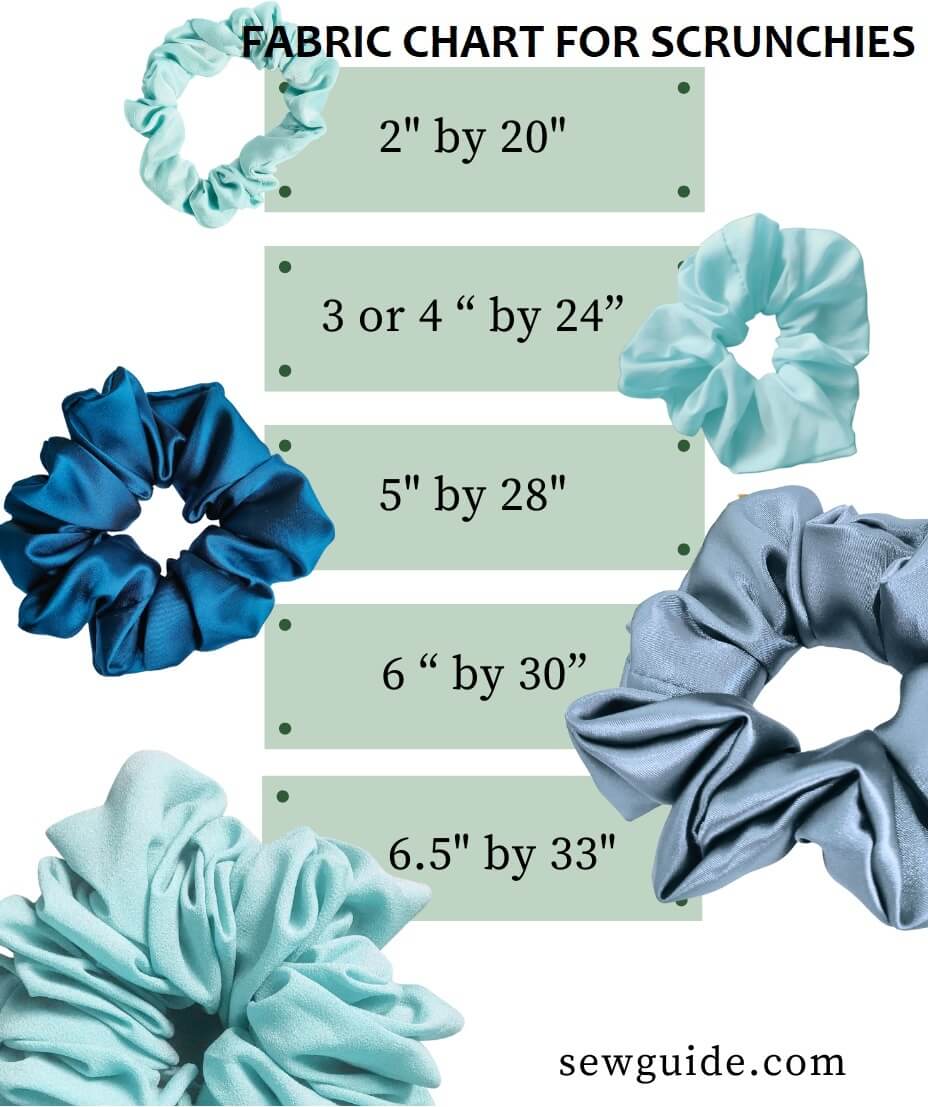
Cut a piece of fabric 3 inch – 4 inch -5 inch wide ( depending on how wide you want your scrunchie) and 17 – 20 inch long (3 times the length of your elastic). For a very thick and dense scrunchie you can cut a long fabric of upto 45 inches.
Increase the length for more ruffles or increase the width for more thickness. needle and thread, a small pin and optionally the sewing machine. If you want to add beads, buttons, or bows, then those too.
Basic homemade Scrunchie – Step-by-Step instructions
Step 1

Fold one short edge of the fabric 1/4 inch to the inside. Press in place with an iron.
Step 2

Fold it by the center, right sides to the inside, lengthwise and stitch the long edges together with a 1/4 inch seam allowance.

You can use simple hand stitches to sew your scrunchie seams – Hand stitches work as well as the machine stitches. Just make a Back stitch or any other hand stitch you wish to make (You may wish to toss the scrunchie at some point into the washing machine for a good cleaning; for this a good stitching line will be needed).
Step 3

Attach a pin on one end & turn the tube inside out through one short end. You now have a long tube.
Step 4
Cut out a piece of elastic – 5 – 8 inches long (I am using one single elastic length. If you have extra thick hair, which regretfully I don’t, you should be using two lengths of the elastic)
Step 5
Insert the elastic through the opening with a small safety pin.
Pull the elastic ends together and stitch two or three zig zag lines enough that they are secure.I simply tie two or three knots with the ends. This is ok with a thick scrunchie, but with the narrow scrunchies, you will have to stitch.

You can at this point try this on your hair and see if the length is enough / big for our hair. If it is too big cut off extra ends and tie/ stitch again.
Now bring the fabric edges together ; insert one end ( the raw edge) to the other ( one with the turned inside edge).
Step 6

Hand stitch the ends of the scrunchie. You can use invisible stitches for this- like a ladder stitch.

You can use different types of fabrics to make scrunchies. Make it in in velvet. Black is my favourite as it goes with all colors. You can change its size, shape and style in many ways. Some of them are as below
Scrunchie variations
Idea 1 Thin scrunchie

To make a more narrow scrunchy cut a fabric strip 1 1/2 inches wide 17-20 inches long.This is for 1/4 inch elastic.

Make the scrunchie the same way as explained earlier.
Idea 2 Lace edged scrunchie

This scrunchie has a lace trim between the seam on the outer edge. This is a basic scrunchie with a slight difference.
Before the step 2, ie stitching the long edges together insert a piece of lace trim ( or ribbon or fabric piece folded) inside as in the picture below

Continue making the basic scrunchie, by bringing the long edges together. Here you have the lace inside, that is the difference.

When you finish making it, you will find that the lace trim will form a nice frame outside the scrunchie.

You can gather lace trim before keeping it inside for more frills.
Idea 3 Lace ruffle scrunchie
For this, I am using a very wide cotton lace. You can use any wide lace or fabric piece which do not fray at the edges or wide ribbon. It should be wide enough to accommodate a channel in the middle for inserting elastic.
You need 2 pieces of lace 20 inches long.

Keep the lace pieces stacked on top of the other so that the good scalloped edges are facing to either side. Sew a channel in the middle which is 1/2 inch wide.

Insert the 1/4 inch elastic ( 6 -7 inches long) through the channel with a safety pin.

Pull the elastic and stitch the ends together. Now hand stitch the ends of the lace together
Idea 4 Double-sided scrunchie

This is made by keeping two different pieces of fabric strips together. One fabric piece is 3 inch wide and 17 inch long and the other one is 2 – 2.5 inch wide and 17 inch long.
Keep the two pieces right sides together and stitch the two long edges. This is your fabric tube for the scrunchie. This makes a scrunchie in which one piece of fabric will show to the other side like a frame.

Make the scrunchie the same as you would normally.
Idea 5 No sew scrunchie
Wouldn’t it be nice to make a scrunchie without sewing
This is a no-brainer. If you would rather not sew you can still make a scrunchie, without the sewing machine or hand sewing. You need some sort of super glue / glue gun for this. Use the super glue to fix the edges ( other than the sewing part the basic scrunchie making steps apply here).
Idea 6 Make a no-sew ruffled net scrunchie

This scrunchie is a very easy project. If you have any sheer or other fabric which does not fray you can make this. I am using a beautiful leftover fabric from my lehenga skirt pattern project. It is a dream fabric which is exactly right for this one. I suppose you can use tshirt yarn also

Cut 1 inch strips of fabric. I took a length of 120 inches to make this scrunchy ( 30 inch long 4 pieces which are 1 inch wide). Cut them further into 2.5 inch pieces.
Cut the 1/4 inch elastic to 7 inch length. Sew the edges together really well, so you have an elastic band.

Now start tying the short pieces of fabric on this elastic band. One tight tie is enough.
After you have done the tying( make sure that not even a speck of elastic is showing through. If it is, tie more strips to cover it). You can trim the outside to look a perfect circle or leave it untrimmed as it is
Idea 7 Scrunchie with beads

Beads add beauty to just about anything. Why leave scrunchies behind. Add beads in any way you want. I have taken the easy way out and just wrapped bead chain around the scrunchie.
You can stitch beads onto the fabric using artistic Bead Embroidery or add beads in intervals, folding the scrunchie to look like petals.
If the scrunchie is thin you can even thread big beads with the scrunchie before joining the short edges and elastic.
Idea 8 Make Bunny ear scrunchie

This is made by adding a bow to the basic scrunchie. To ensure that the bow holds its shape, cut the fabric with interfacing attached to the back of the fabric.

I cut the shape on folded interfacing piece, ironed it to the fabric and then cut the fabric in this shape.

Sew two such shapes together, right sides inside, along the edge. Leave a space in the center unstitched. Turn the shape inside out through this unstitched space. Hand stitch the hole closed. Press.

Attach it to the scrunchie with a small folded strip of fabric. Stitch in place (again hand stitch). You can add a fabric bow as well the same way. Checkout the post on making cute fabric bows here
You can also add bows to your scrunchie. Check out the post for making 10 types of hair bows here.

Idea 9 Faux fur scrunchie
For a puffy scrunchie make it with a fabric with great volume like the faux fur.
Idea 10 Scrunchies with contrast bands
This scrunchie is made the same way as the one with the lace trim in Idea 2.

Instead of the lace trim a folded fabric strip is stitched to the inside of the fabric tube seam. Fold this fabric strip and lay as in the picture given earlier, folded side to the inside of the scrunchie fabric.

There may be many reasons why you are making these scrunchies – for one, they make the cutest gifts. And it is so easy to make them. And they are fun and creative to make.
Do you know that scrunchies are so much better than rubber bands or clips or anything you use to tie your hair. The fabric that encases the elastic make the scrunchie gentle on the hair – I have lots of jagged hair, cut from pulling bands and clips out of the hair. That is my number one reason. What is yours?
Related posts : Sew fabric hairbands ; Different types of hair accessories; How to make simple hair accessories ; Decorate hairclips,tic-tac clips

Hi. Do you have tutorials on how to do a layered scrunchie. I’ve seen designs where there is a fabric inside and tulle or chiffon outside. Thank you so much!
No, Sorry; only this post on scrunchies
Roana, just lay both fabrics right sides up, one on top of the other, and treat them as one piece. Sew them together as in the instructions.
can not down load scrunchies info.
Hi Marilyn
I do not think you can download the page. Can you not read and do ?
anyone here during quarantine?
Hi Nitika
Seems like only me : )
Hi
These look great! Does it matter what elastic you use? Size and tightness?
Thanks!
Hi Emma
I would advice you to test on your hair. Elastic quality do vary from place to place.
This is so cool! I’m so glad you shared this!
Bev
24 September 2019
It is great the ideas you share, thank you now I can try to sew.
tysm! very helpful and great ideas very creative
Thank you Amelia
Great ideas. Thank you!
Wendy, Thanks for leaving the comment
Thanks so much. Very helpful