
I use a slip stitch mainly to hem – it is excellent as a hemming stitch. Another use of the slip stitch is that, it can make your stitching look invisible both on the right side and the wrong side and at the same time join fabric quite effectively.
Making stitches invisible is what I have always wanted to learn. So here it is, the strong and firm and at the same time the “almost” invisible Slip Stitch, a close cousin of the other invisible stitch, ladder stitch.
sewing slip stitch – STEP BY STEP (Video)
The video is for a neat hem slip stitch:

Use a fine short needle. Thread your needle with a single strand of sewing thread.
Use a perfectly matching coloured thread to your fabric. If the colour is lighter than the fabric it will be all the more visible than if it was darker. So if you cannot get the exact match go for a darker shade.
Step 1
Take the fabric to be hemmed. Fold the hem as per your needs, 1/2 inch twice as I have done. If you are not sure about your stitching, you can pin or hand baste the folds so that further stitching is easy for you.
Step 2

Hold the folded edge so that the folded edge is down and the main cloth is up. But then you can hold it the way it is convenient to you. You just have to have clear sight of where you are going with your stitches. Start from the right and continue stitching to the left. Conceal the thread end knot inside the folds of the fabric. Draw the needle through the inside of the fold very close to the side edge.
Step 3

With the needle take up 1 thread or maximum 2 threads of the cloth.

Lift up the needle and take up 1/4″ from the edge of the fold.
Step 4

Continue making the stitches, with 1/8 of an inch space in between (or longer), ensuring that the stitches are not made too tightly.
If you are stitching two folded edges together, keeping them adjacent to each other, the slip stitch is drawn tight so that the stitches in between would not be seen prominently.
Step 5
Check that the stitches you have made are invisible from the outside. If they are quite visible, you may need more practice. The experts say it is a difficult stitch, so toil on.
How to join two folded edges of fabric – Using Even Slip Stitch
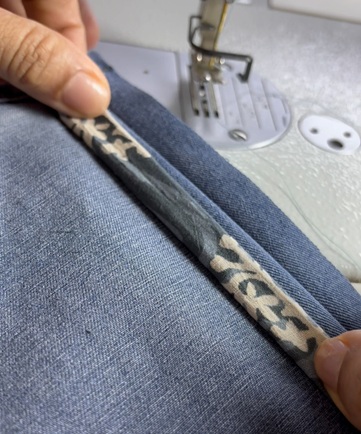
There are many instances where you have to join two folded edges together – for eg an upholstery has come unraveled at the seam and you cannot get your hands inside or repair a lining inside a dress with no access to the inside to the seam – you can use a slip stitch as a seam stitch from the outside. The best thing is that it is a barely visible almost invisible stitch.
In the slip stitch described above, we take just one or two thread from the outer fabric but here we will be going through the folds on either side the same way.
The needle slips through the fold each time you make a stitch. Come up with your needle and thread through the fold on the left side. 
After this enter the adjacent fold and come up 1/4 inch from where you started. 
Go the other side and do the same thing. Repeat these actions, till the opening is completely closed with not even a trace of the stitch on the outside. 
What is Slip Tacking
Slip tacking is the same as even slip stitching – just that it is made on the outside as it is a temperory stitch and will be removed later. It is used as a temperory stitch before the actual sewing to match patterns. It is usually used to match checkered patterns etc accurately. Learn more about tacking stitches here.
When do you use a Slip Stitch
When sewing folded edges like in hems of pant legs, sleeves you may wish to conceal the stitches, and at the same time desire for some give in the stitches (both of which are impossible with a machine sewn hem, unless it is a blind stitched hem).
This is especially useful in sewing hems on thick fabrics like wool where this stitch will easily do a very good job.
You can also use a slip stitch to attach trims on fabric surface especially on delicate and slippery fabrics like silk, which you maynot want to machine sew. This stitch is also used to attach bindings.
Many quilters use this stitch to hand sew the bindings on their quilts. It makes their quilts look as if the binding is not sewed on.
Linings are attached to the main garment unobtrusively by using these stitches.
A slip stitch is also used as a basting stitch when you have to temporarily attach something and try the fitting. You can remove this stitch easily enough, unlike machine stitching, but so far it is firm enough .
The slip stitch can also be used to stitch two folded edges together like you do in ladder stitch. In ladder stitch, you make long stitches on either folds. Here in slip stitch on one side the stitch is a thread or two long.
Related posts : 


How can I stitch a tear in a jacket. It has a lining on the inside and I do not want to loosen the lining to do the invisible stitching on the jacket. Thank you.
Hi Noeleen
Darning is made from the front but even then it will be best if you can detach the darning otherwise you will catch the lining on the back with the stitches. You can add ready made patches on the fabric.This post may help – https://sewguide.com/clothing-repair-mending-tears/
Clearest and most simple explanation of the slip stitch ever. Been sewing since I was 13 years old, many, many years ago.
Hi Norma
Very sweet of you to say that. Thanks for leaving the comment