Picot, as per the dictionary is a small embroidered loop used in a series to form an ornamental edging on lace or fabric, typically decorating the border of a fabric. It is a decorative edging technique.
You can add this to your cloth by placing ready made picot edges or sew it yourself. This edging is also made in crochet, knitting and tatting. You can sew it by hand with buttonhole stitches on the edge with small picots added on top using bullion stitches, blanket stitches and even chain stitches.
Check out this video tutorial for a bullion stitch picot edge:

In sewing it is the best edge finish for sheers and lightweight fabrics. It is a regularly used hem finish for these delicate fabrics and also crispy fabrics like georgette, chiffon, knit, satin, silk etc . For those shawls and dupattas in Georgette and chiffon there is no better edge finishing than this one. It gives you an easy shell edge which looks very attractive.
Checkout the tutorial for a shell edge finish
You can watch this video tutorial to make a picot edge with buttonhole stitch and small chain stitches:
picot stitch (hanD)
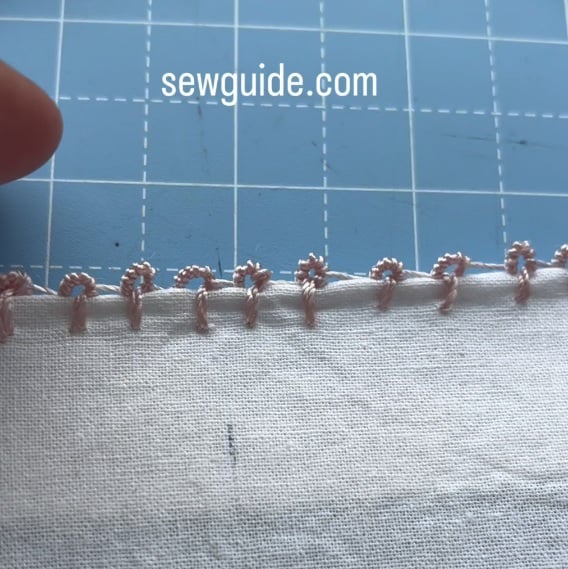
Blanket stitch Loop Picot
You need to roll the edges of the fabric and then a blanket stitch is done on the edge. Then you can add a thread loop done with buttonhole stitches ( as in a thread bar) to make a picot edge. These stitches can be made continuously or spaced.

Method 2. Another way to do Picot edge is to do the blanket edge and then make bullion stitches over the edge .

Watch the tutorial for sewing a picot edge with beads:
How to do the Picot edge stitching with a sewing machine
To make an authentic picot edge you need a picot sewing machine – it gives you a beautiful lace like edge on scarves and fabrics. But if you are ready to compromise, there are ways…..
What do you need, to sew a Picot hem ?
- Rolled hem foot (some machines have a picot foot but you can do allright with a rolled hem foot)
- Zig zag needle plate
- Matching thread in bobbin and top thread. A contrasting coloured thread can also be used for a visual interest.
Step 1. Set the machine stitch length to 3.5 & stitch width to 3.5
In a picot edge stitch, fabric at the edge is folded by the rolled hem foot and the zig zag stitch encloses the fold in thread with small ridges.
Step 2. Keep the fabric right side down on the machine to the left of the feet. Start sewing with a straight stitch. Make a straight stitch for 1/2 an inch on the fabric ( 3 or 4 stitches). Take off the fabric, without cutting the thread. You have a small length of thread between the needle and the fabric now.Cut the thread with a long tail hanging behind the fabric. We need this thread tail to guide the fabric for the picot edge.
Step 3. Change the stitch to zig zag, of stitch width 3.5 and stitch length 3.5. Make sure that the tension on your machine is loose.
Start stitching again, stitching the zig zag on the thread first and then continue on to the fabric, inserting the edges into the folds of the rolled hem foot. Feed the fabric gently into the needle, folding and sewing. A perfect picot edge is formed on the edge. At the end you can make a reverse stitch to anchor the thread.
Step 4. Cut away loose threads

Related posts
Bead edgings and Tassels – 8 types {Tutorial}
How to create fringes ( 9 Types)
How to create Tassels(9 types)
Ref : A picot edged ribbon you can buy for embellishing

Related posts


