Crooked seam lines — even experienced sewists dread them. Tools like a magnetic seam guide can help you stitch perfectly straight lines every time. Read on to know about all the other hacks you can use to stitch your seam perfectly straight.
Throat plate seam guide
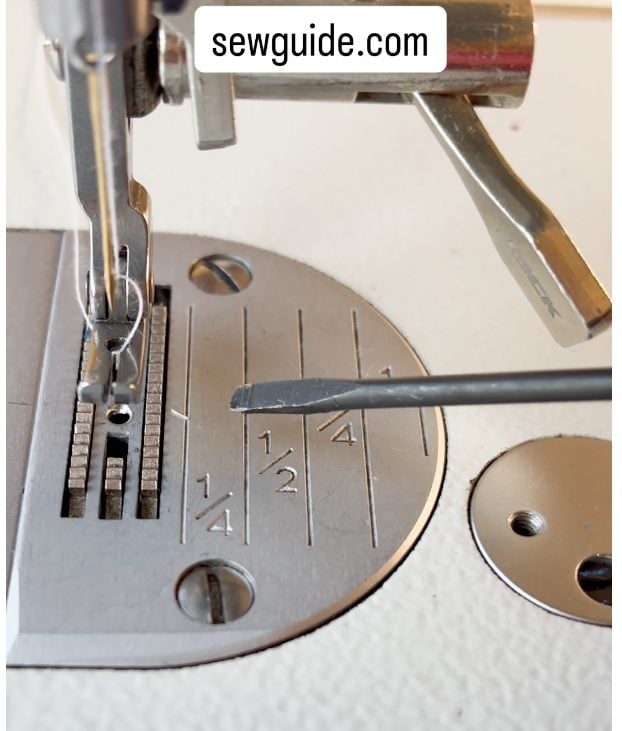
Most sewing machines have these seam guide lines – some have it on either sides; some have cms and inches.
You just have to align your fabric edge against the line you prefer (according to your commercial pattern, type of project, type of fabric and layers ) and you will be stitching straight always.
Do not look at the needle as you sew, look at the fabric edges- are they aligned against these lines always as you sew. If you have cut the fabric correctly and if you are sewing this way, there is very little chance that you will be getting the seam lines crooked.
Checkout this post on seam allowance to know more about it.
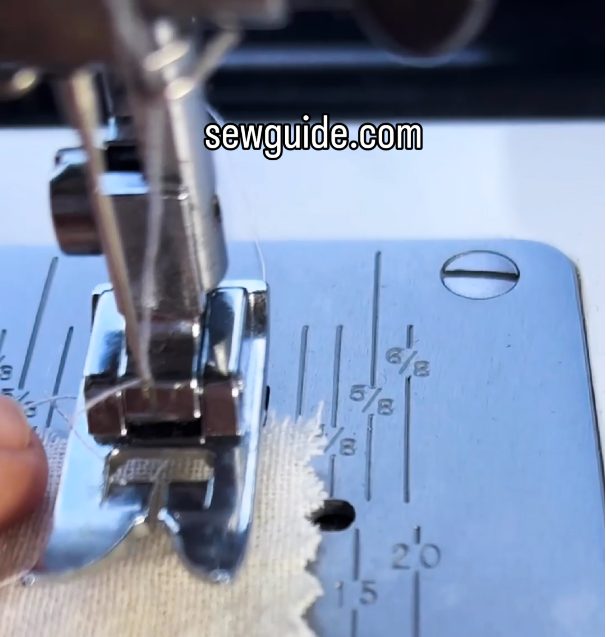
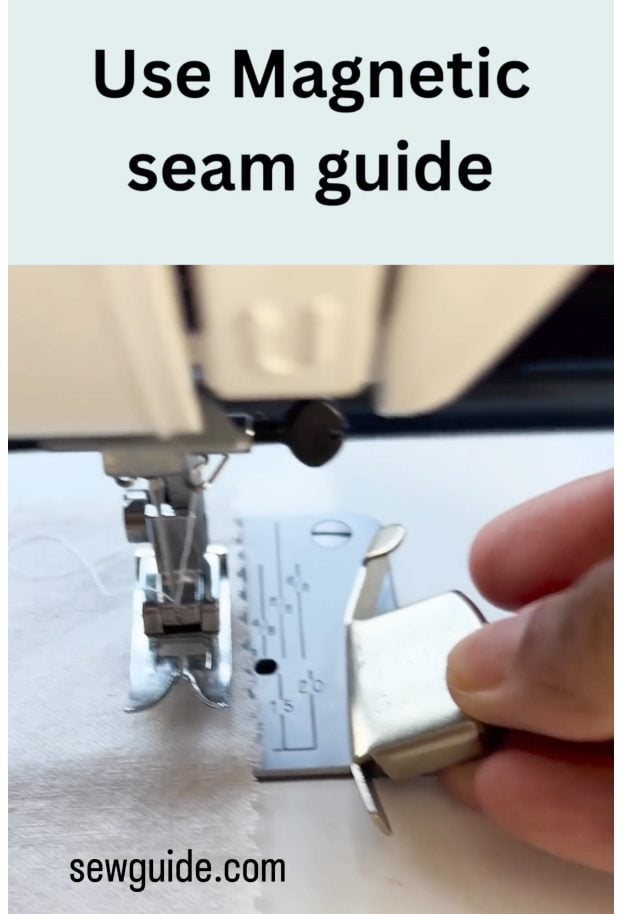
Use a Magnetic seam guide
When the seam allowance is more than 1″ you will have to rely on other tools – like the magentic seam guide. And it is also thick, so the fabric will automatically stop from straying further.
You will be calculating the seam allowance from the needle – keep the magnetic guide measuring the seam allowance from the needle.
Use the correct Pressure foot

If you have a straight stitch pressure foot, use that. This foot has a small hole, and will make sure that you have a straighter straight stitch than if you were using a zig zag foot or the multipurpose foot. It is especially useful when sewing thin fabrics.
If you are stitching many layers of fabric, the bottom layers can shift unknowingly and your seam line can go wrong. A walking foot can help here.
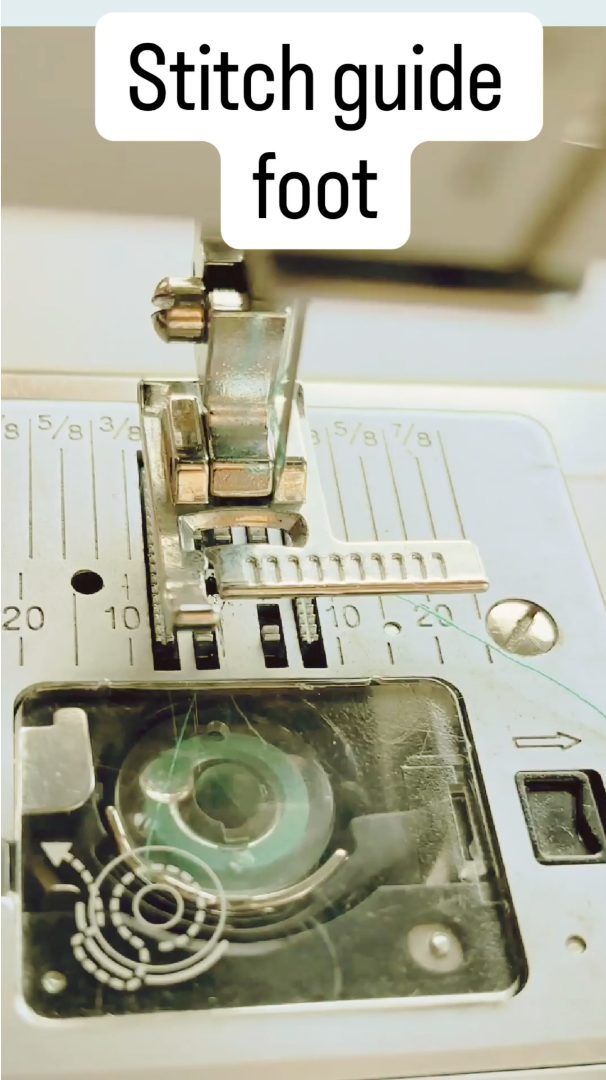
Another presser foot which is helpful is a stitch guide foot – it has an extension to one side and you can guide your fabric edge along these lines to make the stitching straight.
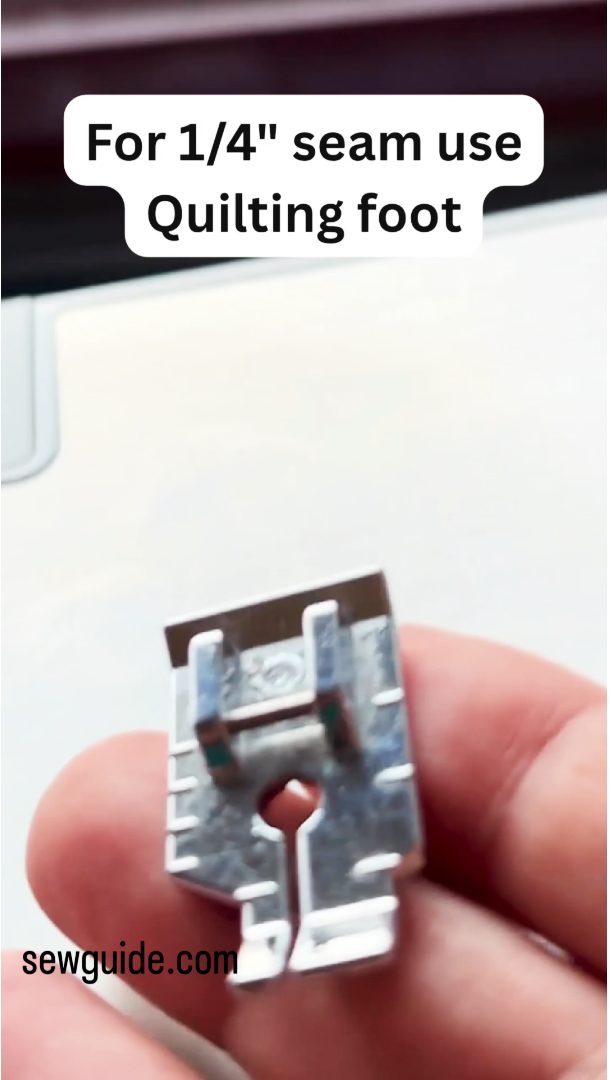
For 1/4″ seam allowance you can use a quilting foot as in the picture below.
Scissors
Do you know the real secret of straight stitching? Accurately cut fabric edges. If your fabric is not cut properly there is no way you will be able to sew straight. From your experience, you must already know that short choppy cuts create uneven edges.
So, Do not take tiny snips – go for big long cuts. Open the blades wide and make those smooth cuts – this will give you smoother edges. Use the sharpest scissors you have – this goes without saying.
Lay your fabric pieces right sides together. This means the sides of the fabric you want to be visible in the final product should be facing each other. Pin along the edge where you want your seam to be. This helps to keep the fabric aligned while you sew. Make sure the edges of the fabric are even.

Choose the straight stitch on your sewing machine. For most fabrics, a medium stitch length (about 2.5 mm) for the straight stitch works well. To sew straight, line up the edge with the desired seam allowance marking on your machine. Sew straight along the edge of the fabric.
When you reach a corner as you sew, it’s crucial to turn the fabric while the needle is still inserted into the fabric. This ensures a smooth and precise pivot.
More about the straight stitch
Most people with modern sewing machines with countless options in stitches will be surprised to know that there are people who sew on machines solely with a straight stitch. Some do it out of choice – because a straight stitch sewing machine is optimally adjusted to doing that stitch best of all and complicating it with other sewing machine stitches would not do for them. Some do it out of having no choice- maybe a straight stitching machine is all that they can afford. But it is the truth that all you need to sew a plain seam and most things is this simple stitch.
Straight stitch, the basic sewing machine stitch which is used for just about everything from hemming to stitching seams and even to do free motion embroidery is really all that you need to sew.

Other than its most basic use of sewing seams, topstitching, edge stitching, understitching, making tucks, sewing darts, gathering, all are done with this stitch. It is the most useful and versatile stitch available in your sewing machine for all the right reasons. The best thing is that you can make a perfect straight stitch without a sewing machine too – just a hand sewing needle and thread is enough. More on that later.
The straight stitch is the best Stitch for sewing plain seams on woven fabrics; But not on knit fabrics and other stretchy fabrics ; here this stitch may break when the fabric is stretched so a zig-zag Stitch is recommended with ordinary sewing machines
Fabric choice and the choice of stitch used for plain seams
Thread for stitching
Use thread according to compatibility with the fabric used – you can use cotton, polyester, nylon, metallics and acrylics. Check out this post on the best thread for your sewing machine project. If thick thread is used on the top thread slot or bobbin you can make zig-zag decorative stitches with the straight stitch
Stitch Length
Stitch length for straight stitching seams can vary from 0 mm to 6 mm. You can make a straight stitch with 0 stitch length. This will make an anchoring stitch before you start the stitching and when you end stitching. Most people use this to prevent straight stitch unraveling (instead of using the reverse stitching, which is another form of straight stitching). With the zero stitch length for a straight stitch you will be sewing in the same place.
You can increase the stitch length upto 6mm in most sewing machines. This is used for basting stitching or for gathering, as such a long stitch is not necessarily strong enough for seams.
The normal stitch length for sewing seams is somewhere around 2 to 2.5 mm for most sewing machines. You will have to experiment with your sewing machine to find what you like the best.

Thin and delicate fabrics are best sewn with a short stitch length ( less than 2mm); For medium weight fabrics increase te stitch length to 2.5mm and for heavy weight fabrics a stitch length of 3 mm is good
There are certain problems you encounter when you start to straight stitch – like how the fabric starts to pucker, how thread gets cut in the middle etc. Some or all of these problems are solvable easily with some easy sewing machine maintenance and other adjustments .
Decorative Stitching
The straight stitch can be used to create decorative effect on your fabric in various ways. Topstitching is the foremost way. A denim jeans decorated with orange top stitching is one that comes to my mind- it is so startling and beautiful.

Using a double needle on your sewing machine along with a straight stitch is another way. You can use a thicker thread on your top thread slot for a different effect that the ordinary straight stitching. Use a thicker thread on the bobbin for even greater effect – in this case you will be using the bobbin thread as the top thread – ie stitching on the back side so that effect is shown on the front. Try it – You can check out the post on bobbin work for more details.
How to make straight stitches with hand sewing needle and thread

There are three hand sewing stitches that resemble a sewing machine straight stitch. The running stitch and the back stitch and the pick stitch. A running stitch will have void space between stitching so a back stitch is more close to the straight stitch. Infact you can hand sew a whole garment with back stitch and if made evenly and small (with infinite patience) it can look as if it is made by a machine. Are you up to sewing a straight stitch like this, for an enitre garment?
I think I will stick to my machine and use hand sewn straight stitches for embroidery and small alterations.
Related posts : Basic Stitches in a Sewing machine; Uses of Decorative stitches in a sewing machine; Pick stitch and its uses; Different hand sewing techniques


Does anyone know if it is ok to use a magnetic seam guide on a very modern machine I have heard both answers.
I have a question about useing a magnetic seam devise on a modern sewing machine. I have heard not to use this on a computerised machine and also heard that is is ok to use. Please clear this question. Thank you
I do not think it will cause a problem to use it on the but I am not 100% sure as I do not own a computerised machine . I would think all the important parts are located inside the head section, usually behind or near the display panel or stitch selector panel. You keep the seam guide on the needle plate. To be sure, Can you not ask the machine dealer you bought it from (or if you bought online, any dealer shop near you would answer this for you?
hi, your website is very usefull, i really like it, i have a pfaf 4.5 creative but i dont know how to make parfection embroidery, is there any classes for that particular machine, if i dont find any classes then its no use of me keeping the machine, i only used it for 17 hour. if anyone interested to buy also welcome. my main massage was to learn how this machine works. thankyou
Hi Hajera
Do you have the service manual of that machine with you – if you do not have check the pfaf website – you can download it usually from the website. Youtube usually have all the tutorials like this -but you must have tried that already, right?