
When it comes to dressing, the neckline is one of the most critical factors that can make or break your looks. A good neckline can enhance your looks and flatter your body. But a bad one can wreck the whole outfit. Below you will find a method to draft a pattern for a simple neckline.
Neckline sewing – Step by Step
There are two measurements you need to make pattern for a neckline. Neckline depth and neckline width. Both these measurements are measured based on the High point shoulder, which is the highest point on the shoulder seam where it meets the neckline. If you are wearing a good fitted dress, you will find this as where the shoulder seam meets the neck of the garment
Neckline width is measured horizontally from the high point shoulder (HPS) across to the other HPS. Neckline depth is typically measured vertically from the base of the neck at the high point shoulder (HPS)
A square neckline can be made very narrow or very broad and the width you take is what changes this. If you start with a 3.5″ (half width) measurement, you will get a narrow square. For me, a wide square works better and that will need more than 5.5″ width on the pattern.

The boat neckline is shallow in depth (1.5 to 3″) but wider, even to 8″.
Whether you’re modifying an existing garment or starting from scratch, you need a neckline that looks clean and neat. For that, you have to do some necessary things in dressmaking – pressing, clipping and finishing the edges. No skipping those!
If you are looking for embroidered necklines, jewelled necklines, or piped necklines the stitching and finishing processes are different.
Watch the video for finishing the neckline perfectly with a binding: Nowadays this is my favourite way for sewing the neckline.
Watch the video for finishing the neckline perfectly with a binding: Nowadays this is my favourite way for sewing the neckline.
Choose the neckline you want
Check out the post on about 60+ different types and variations of neckline designs. You have to decide on which neckline will compliment your body. For this, reading the post on choosing the best neckline would be ideal.
The most popular necklines are the basic ones – round shaped necklines, and V neckline.


Create a paper pattern of the neckline area
As you make the bodice pattern, mark the neckline area with a marking tool. Draw the curve of the neckline using a french curve. Remember to take into account seam allowance. Mark the center front and center back of the garment. Make a notch.
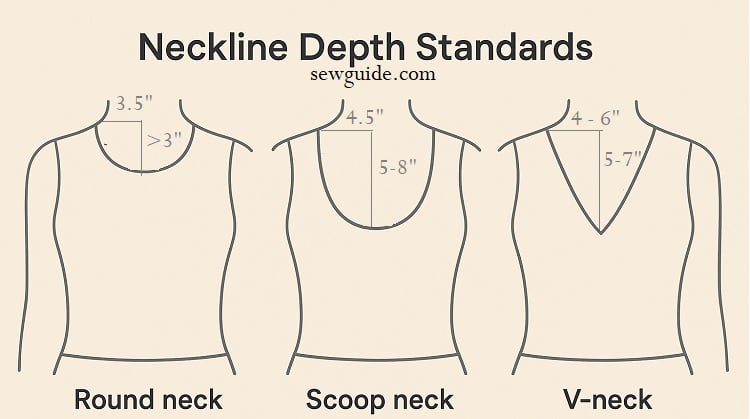
You can use the following convenient chart to determine how much breadth and depth of the neck you should mark according to the bust measurement. The chart gives the measurement for a neck that is very close to the neck. If you want to, you can fold a favorite top or dress bodice, measure the neckline for neck width from the center fold line and the neck depth, and go from there.
Neckline depth and breadth chart

0-1 Mark the neck width as per your bust measurement ( as seen in the table)
1 – 3 Mark the depth of the neckline ( as you need it or refer the table)
1-2 Mark straight down
2 -3 Join 2 to 3 in a straight line

Decide on the method of finishing the neckline
Behind a lot of nice-looking neckline is a facing. Without facing, the necklines will turn out shabby and unprofessional-looking. Checkout this post on making a facing for the neckline and assembling it, for the correct way to sew the neckline you have drafted.
Another option is to cut out interfacing in the shape of your neckline; cut out the facing in this shape with some extra seam allowance and sew this facing to the neckline.
Take a square piece of cloth 10 inches into 10 inches. Iron the interfacing onto the wrong side of this square piece of clothing. Mark the Neckline on the right side of this cloth. After marking, leave one and a half inches margin and cut along the edges of the neck. Finish the raw fabric edges of the facing before sewing it to the neckline.

Assembling the neckline with the facing

For all the necklines the breadth of the neckline and the depth is first marked on the folded cloth (I mark on the wrong side of the facing cloth)
Other options for sewing a neckline are finishing the neckline with a binding or using a lining.
Binding may be the easiest method of sewing the neckline. You just have to finish the edges of the neckline with a bias cut fabric strip (you can cut it from the bodice fabric itself)

Related posts:

The other method is to use the lining fabric itself to finish the neckline edge.

- How to finish necklines of sleeveless bodices with lining
- 50+ Neckline ideas for salwar suits/ Kurtis/churidar.
Using a facing on the neckline after embroidery is finished on the neckline.

Other posts related to different types of necklines
- Queen Anne neckline
- Beaded neckline edge : How to finish neckline with beads – easy ways
- How to sew Neckline Slits
- Square necklines
- Tutorial for a keyhole shaped neckline
- Cape neckline
- Sweetheart Neckline :5 types & (Sewing tutorial)
- V-Neckline : 6 ways to sew a V-neck in a dress/top
Checkout the tutorial to make a tank top to see how this neckline is assembled with the facing turned outside as an embroidered yoke

Related posts :


Need to show how to fill in a neckline from big to small. It’s easy to visualize taking fabric away to scoop it out, but not how to get a smooth neckline putting fabric in.
Pls I find it difficult to cut a high neck at the back, and a deep 1 in front ,help me out.
Please check Queen Anne neckline tutorial
very valuable post thank you
Am using a keypad phone and the chat didnot show well
So nice I really enjoyed it
Woah
wow!! Thanks alot, i have been learning sewing on my own this is so helpful and easy to learn.
Good
Hi, my name is Grace, I find your teaching here very helpful thanks.
Pls I need your help on how to cut a normal sleeve. What I saw in ur article is just types of sleeves. Thanks
Hi Grace
Can you check out this page – sewing sleeves
Very straight forward. Thanks
The tutorial is straight forward and helpful. Thanks
Thank you so much for these.
It’s indeed helpful but why should the depth have more inches more than the width?
Wow this is great
This page is helpful
Hi Olaide
Happy to know that ; thanks for commenting
Thanks slot but at least show as pattern drafting also
Thanks. This is so helpful.
Your tutorials are very helpful. Thank you for sharing.
Thank you ………for easy way to learn , it’s really helpful.
Thanks so much, your website is really helpful.
Wow! This is wonderful, thanks alot
This is very helpful to me. I’ve been sewing all my life with no professional instruction, and recently been trying to learn more about other techniques. I’ve always used patterns or my own clothes and made varying changes to get the design I have in mind. I’d love to become better at pattern drafting and tailoring, as some of my more difficult pieces are more ‘error’ than trial.
One neckline/bodice I can’t find much help with is the sort of halter (perhaps this is not the correct term) which is like 2 triangles that overlap at the chest and go upward to tie at the back of neck. I see it most often on bikini tops, but I adore this style on an empire waist dress. I wonder if you have any tutorials or suggestions on more professional methods.
Thanks for sharing this great information, I’ll be visiting often!
Hi Joy
Thanks for the comment.Maybe this one would help – https://sewguide.com/halter-neck-top-diy-pattern/
Thanks very helpfull, have been looking for something like this.
I’ve been looking for these or years–Thank You
thank you, it’s really helpful.
Hi how are you? I am struggling with the designing and cutting of the v-neckline. Please help urgently.
Many Thanks
Thanks this was very helpful
Very helpful and straight forward. Thanks
Thanks Bola
thanks, its a great tutorial.
Thank you
This is very helpful… thank u for the tutorials
Thank you so much. The tutorial was quite helpful.
Tutorial very helpful
THanks
Thanks so much! Highly educative and easy to understand! Keep it up! Thumbs up for you!
🙂 thank you
Ooooo its really helpfull even to a beginner, so easy to understand. Thanks big
Thanks a lot. Your tutorials are very helpful.
Very informative. Thanks for sharing.
🙂
thanks a lot .kindly send me man shalwar kameez patteran.
Thanks for the tutorials
🙂
I found this tutorial helpful
🙂